Showing posts with label blue. Show all posts

Thursday, 30 August 2012

Summer Blues...

At this time of the year I always find myself asking where has this summer gone?  With only a few days of August left before we enter into September and then into autumn and winter, I wonder why the summer has past so quickly this year, why I didn't have that many BBQs and dreading the thought of the cold, wet, darker days of the winter fast approaching.  Despite all these things autumn is actually my favourite time of the year, and I have lots of things I am looking forward to blog about, but I can't bear to part with the summer quite yet so I thought I would do a design for those of you that are hanging onto the last few days of summer.


Blue is one of my favourite colours, and in my opinion this time of year is the perfect time to wear it.  Transitioning through summer to autumn means you are likely to have a tan, well if not a tan slightly more colour than in the middle of December, and blue is a great way to make yourself look more tanned.  I have chosen 2 shade of blue for this design, a pastel blue and a sky blue, both lovely colours.

The darker of the 2 shades is this gorgeous sky blue colour that is not to vivid, or the dark but the perfect colour blue colour from Barry M called "Blueberry Ice Cream" number 306.  In my opinion the colour reminds me more of the colour of a blue smartie, so that will give you some indication of the true colour.  I have had this colour in my collection for ages now, and every time I wear it I wonder why I don't wear it more as I always get compliments on the colour.  You can pick this up quite cheaply from Superdrug in store/ Superdrug website, Boots in store/ Boots website or on the Barry M website.  I love Barry M as their nail paints come in such a range of colours, they apply beautifully and they are very cheap, £2.99 for 10ml.  It always amazes me how well this product applies, as it is q relatively thick consistency it means that it only needs 1 coat in my opinion, 2 if you are really concerned about the opacity.


For the other blue I have used Revlon's "Blue Lagoon" which is number 044, which I got last summer so although you can't get this in store you might be able to find it on the internet or on ebay somewhere.  I picked this colour up because of the light blue colour which I did not have in my collection.  What makes this unique is that it is a light blue colour with extremely finely milled glitter which doesn't even look like glitter but gives the colour a slight shiny appearance in the bottle.  This was very intriguing because I thought this would be a nice alternative to when I don't feel in the mood for a thick and chunky glitter polish.  But unfortunately the glitter is so finely milled that it is not really noticeable on the nails which is a shame but I still love the colour and it is a colour that comes out throughout spring and summer.  This polish requires a few more coats, I applied about 3 coats to create a more opaque colour.

The combination of the light blue and the sky blue I think are summery enough to last you through the last few full days of sunshine but also won't look out of place at the beginning of the autumnal season.

Let me know if you like to wear blue nails this time of year? Or what is your favourite colour to wear on your nails when the weather is becoming a bit more autumnal?

If you give this type of 2 toned blue nail design let me know, you can tweet me a picture me twitter name is @colourfulnails1, I would love to see you designs.

Friday, 10 August 2012

Summer Nail Challenge - Day 10

I'm back after a few technical glitches and today is Day 10 of Makeup Savvy's Nail Challenge and todays theme is gradient nails, if you don't know what I am talking about then you can see more info on, or if you want to get involved yourself you can find all the information HERE.  I also did the challenge on day 6 and 7 so if you want to see my glitter nail post then you can HERE or if you want to see my neon nails you can HERE.

This was quite a tricky theme for me because I did not want to do a design using glitter because I recently did a summery glitter design, and I am not to good with the gradual change of colour from dark to light on a single nail.  But at the same time I wanted to challenge myself and not just stick to a plain colour on a nail.  So whilst reading through some blogs last night I found this gorgeous design that Lacqueerisa created, it added some texture to her nails and the design was very eye catching, so I decided that I would have a go myself but using a light colour underneath a brighter shade, and when the design was completed I hoped it would give a different sort of gradient of colour.

10 nail polishes later this is the design I created and whilst it did not go quite to plan I think that it is a different technique that after a few goes will probably be a lot better, but in the mean time this has challenged me to try a new design I probably otherwise wouldn't have done, so its a learning curve.  If you want to see what inspired me to do this design, and how the design should look then you can see the lovely Lacqueerisa's design HERE.


So instead of giving you little reviews of the colours I have used for each nail I'm just going to explain how I did this design, as otherwise this would be a very long post.  Although, I have already done reviews for some of the polishes which I will link, but if you want to know anything about the colours I used then leave a comment below and I can always do some reviews if requested.

Okay so here we go... First of all I chose the base colours for my design which I wanted to be slightly lighter shades so that I could create the gradient effect that todays theme required.  I also tried to do a a gradient effect going along the nails starting with yellow and white right down to blues on my little finger.  To start with I painted my thumb a white colour to then be topped with yellow as I didn't have 2 shades of yellow, but actually in the end I quite liked the colour difference between the yellow and white.  This white was a basic white colour that I got in a Primark manicure set a couple of years ago.  


On my index finger I then used in colour 452 which is a peachy orange colour by Miss Sporty which is very pretty and summery colour that I have been wearing a lot this summer.  On my middle finger I have used this baby pink colour by 17 which is called Cupcake which I think is the perfect name for this extremely girly colour.  On my ring finger I have used this gorgeous light purple colour called Purple Sherbet from Ciaté which I have done a full review on which you can see HERE if you wish.  Finally on my little finger I have used this light blue colour from Barry M called Blueberry Ice Cream number 306.


After letting these colours dry I then chose colours that were similar but a shade or two darker so this would create the gradient effect that was required for todays theme.  For my thumb I chose this bright yellow colour by Miss Sporty number 453 which I also used in my neon nail challenge on day 6 and a few other reviews and designs.  On my index finger I used this bright neon orange from Miss Sporty number 303 which I also used on my neon themed nails on day 6.  On my middle finger I used this bright pink colour from 17 which again I used in my neon nails so
 if you want to know anything else about these 3 polishes you can see more on my Neon Nails post HERE.  


On my ring finger I used this bright purple colour from Barry M, suitably called Bright Purple number 303.  And finally on my little finger I have used another Miss Sporty polish in the colour 060 which is such a beautiful colour and has been a firm favourite of mine both last year and this year for summer, so I may be doing a review of this soon, so keep your eyes peeled.


Once I had painted my nails I waited for a few seconds so the polish begun to set on my nails before using a cocktail stick to create the textured pattern on the nails.  I ran the cocktail stick across my nails scratching some of the product away revealing the colour underneath.  This may have not worked perfectly on all the nails but I think that you can see some of the lighter colours coming through from underneath and so I think it does qualify as gradient I just wish it had worked as well as I thought it would.

Overall I am pleased that I have tried this design out and it is something that after a bit of practice will be something to do, that will be extremely eye catching and that people will ask how you have created the design so look out for some more designs from me using this technique as I love it!

If you have entered todays challenge feel free to leave a link to your blog in the comments section below, or feel free to email or tweet your photos to me, all information on how to contact me can be found on the right side of my blog.  If you haven't entered today feel free to head on over to Makeup Savvy's page to see tomorrows category HERE and see if you are up for the challenge on Day 11.

Monday, 6 August 2012

Summer Nail Challenge - Day 6

So I realise a challenge should start at Day 1 but after seeing the post only yesterday I decided that its better to be late than never.  I have decided to do Makeup Savvy's 15 day challenge which if you want more info on, or if you want to get involved yourself you can find all the information HERE.


Okay so today's theme was glitter and I wanted to do a summery design that is appropriate for the summer holiday season, if you are going away or staying at home I think that this is something that everyone can wear, no matter where you are this summer.  I was contemplating using the models own glitter in Ibiza Mix which is a very summery polish but as I have already used that in a few of my reviews and posts which you can see HERE if you wish, I decided to use another combination which is equally as summery.


I have recently done a post on the MaxFactor Mini Polish Dazzling Blue - number 14 -  which you can read HERE if you want to find more information about the product and what I thought of it.  I think it is the perfect summery blue that is not too over the top, so everyone can use this for what ever summer event you may be attending this month.  This polish doesn't have any glitter in it but makes a gorgeous base, especially as it catches the light and changes colour which I think is a lovely combination with the glitter which also sparkles in the light.

I then decided to add a blue glitter colour on top as to keep with the blue theme, and for this I chose NYC's Lights, Camera, Glitter - number 105 - which is one of my favourite glitter polishes to date.  When I first saw this polish I was instantly drawn to all the glitter suspended in the polish, this was an instant seller as it looked really pretty and glittery.  But when it came to applying it I didn't have high hopes for the glitter to pay off as it in the bottle onto the nails, as I thought back to when I was much younger and would spend hours fishing around the glitter polish to get more than one glitter particle onto my nails at a time.  Upon application, I have to say I was pleasantly surprised that all the glitter translated beautifully onto the nails.  


Although there are far fewer larger pieces of blue and purple glitter on my nails, the fact that this largely milled glitter is suspended in a very finely milled silver glitter meant that even though the large pieces of glitter didn't totally cover my nails the small pieces did.  This meant the nails weren't patchy or unevenly covered, instead it left this beautiful blue glittery nail that was not too in your face, but when it caught the light meant it sparkled enough to catch some peoples attention.  


I love this new found combination and definitely will be trying this out again in the near future, whilst also trying different combinations with the glitter polish as I think the pay off for the money is excellent.


If you have entered todays challenge feel free to leave a link to your blog in the comments section below, or feel free to email or tweet your photos to me, all information on how to contact me can be found on the right side of my blog.  If you haven't entered today feel free to head on over to Makeup Savvy's page to see tomorrows category HERE and see if you are up for the challenge on Day 7.

MaxFactor - Dazzling Blue

When I was in Superdrug a while back they were having a 3 for 2 offer, so I decided to try the MaxFactor Mini Nail Polishes and after a long and hard deliberation I chose up Fantasy Fire, Moon Dust and Dazzling Blue.  I have done reviews of Fantasy Fire on my blog HERE and I recently did a guest blog on Imagination in Colour which is another Nail Varnish blog so if you aren't already subscribed to this blog, you can check her blog out HERE and my review HERE.  So finally here is the last of my MaxFactor Minis reviews so here we go....

When I purchased this polish I was stuck to decide a third polish to go with Fantasy Fire and Moon Dust and it was between Graffiti and Dazzling Blue.  I decided to go for Dazzling Blue because it is a lighter shade of blue than graffiti and for that reason I thought I would get more use out of it throughout the summer months.  To be perfectly honest this was the one that was theoretically free in the 3 for 2 deal so I wasn't expecting too much, but when applying this to my nails I fell in love with the colour and everything about this product, probably making it my favourite out of the three which I was not expecting.

The consistency of the product was a bit thin so required a fair few coats to get an opaque finish, but unlike the other two products I found that it actually built a lot more, so the whole process didn't feel as laborious because you could see the product becoming more opaque.  I think for the full coverage I used about 4 coats, which is quite a lot but the finish is pretty opaque so I am pleased with how it turned out.

The colour is another thing that drew me to the product as the light blue was a colour that I hadn't seen before.  It was only on closer inspection that I could see the different tones and shades of this product.  In some lights it can look slightly more of a green or a light teal colour or in other lights a glint of light purple appears on your nails so in my opinion this is a very unique product.

I know that many people are a little sceptical about blue nail varnish but I think in the summer it is the perfect time to wear a blue polish as a statement piece if its a vivid blue colour, but if not then this is more of a subtle alternative.  Also this colour sort of reminds me of a mermaid kind of colour and for that reason with a tan on holiday I think this is a stunning colour to wear on the beach, by the pool or if you are staying at home even at a BBQ with friends and family.  I would highly recommend this product and if you have a chance next time you are in Boots or Superdrug check out the MaxFactor section as I think these mini pots are the best way to try out new colours without having a massive bottle of a colour you only wear once in a blue moon stuck in your cupboard.


Have you tried this colour?  What do you think about blue polishes?  Whats your favourite MaxFactor mini polish and do you have any recommendations for ones that I can try out next.

Tuesday, 5 June 2012

Jubilee Nails

For an easy way to navigate around my blog I have create a compilation of all the photos of Jubilee designs that I created so that if you like the design you can click on the matching number to the design that you like and you will be taken to that design...now thats what I call magic!


Have a wonderful Jubilee bank holiday and let me know if you try out any of my designs!

Jubilee Nails - A spot of colour

For my final post of the Jubilee bank holiday I have decided to go for something that isn't the traditional designs that I have mostly shown before, instead this is something a little different but still with the red, white and blue theme.


For this I used the same colours as I used in the first design which can be found HERE but you can use whichever colours you already have or that take your fancy.  I simply painted my nails a white colour all over, before adding the colour detailing on top.


You can obviously use more technical tools such as dotters along with many others but what I used, which is just as good and much much cheaper...a hair grip, curvy grip or bobby pin whatever you want to call it.  I got a pack of 50 for £1 at Poundland and they are in my eyes just as effective.  Just dip the curvy grip into the nail polish, and the more you use the bigger the dots that you create, simple.


For the first part of this design I chose to use alternating colours of blue and red dots on the design, which you can leave as a final design, but I then decided to add to this design by also using the opposite colour to the one that I had already applied to the nails to create more of a busy design what incorporated red, white and blue into all nails.


I think that these nails are very easy to complete and are something that you could even wear after the Jubilee celebrations because they aren't as obviously Jubilee related, unlike some of the designs that have Union Jacks on.

Sunday, 3 June 2012

Jubilee Nails - Patriotic spots

When I created my previous design, a twist on the traditional French manicure which you can find HERE, I decided that I actually wanted to develop this idea to make it more unusual than the first design.  So after creating the design which you can see from the previous post I had a white tip design, which I then decided to decorate into another design.  I wanted to keep the design of red, white and blue for the obvious patriotic theme that I have tried to show in all of my designs.  I wanted to create an interesting design in the small space that I had left on the tips of my fingers and so I decided to create a dot pattern.
These patterns can often be over thought and seen as too difficult to even attempt but I think this is actually much easier than people expect, so you can make people think you have amazing skill, when in reality it doesn't take much.  


You can obviously use more technical tools such as dotters along with many others but what I used, which is just as good and much much cheaper...a hair grip, curvy grip or bobby pin whatever you want to call it.  I got a pack of 50 for £1 at Poundland and they are in my eyes just as effective.  Just dip the curvy grip into the nail polish, and the more you use the bigger the dots that you create, simple.  


I personally chose to use contrasting colours to the base of nail colour, but you could also use 2  or more colours on the nail tip for different designs and ideas.  Overall I think that these nails are very interesting designs that incorporate very simple and quick techniques to make a nail design that looks like it takes a lot more time and effort.

Jubilee Nails - British Manicure

For this design I created a unique take on a French Manicure design, which looks a lot harder to achieve than it actually is.  To see what colours I used as part of the design click HERE to see the original post I did about Jubilee colours.


For this I simply painted my nails alternating blue and red colours, I deliberately left out the white nail because I wanted to use the white for the tip of the nail, but you could easily have a white nail and use alternating red, white and blue tips for another design idea.
After painting my nails a block colour I then used a white colour to create a French tip, however recreating the perfect French tip can be a tricky manoeuvre especially to get 10 nails looking vaguely similar.  So I changed the design slightly and made the white tip slightly diagonal as to create an interest to the nail as well as making it easier for myself as they could be slightly different and also allowed for error!


I think that these nails are very simple but overall look pretty and are a nice alternative to French manicure or a block nail colour of red, white and blue.  Of course if you have a steady hand or have a tip for getting the perfect French tip then you can also use this for the nails instead of the diagonal design.  Also this diagonal tip can also be transferred into any other design throughout the year, as well as adding this to a nail that has begun to chip and wear throughout the days as a quick touch up tip.

Saturday, 2 June 2012

Jubilee Nails - Union Jack accent nail

If you do not feel brave enough to for the full Union Jack nails then here is a less bold alternative.  If you haven't seen the previous design using these nails you can see it HERE.
I used the same nails so if you want to find out about where I got these from then you can look at the previous post HERE.  I have also used the same base blue and red colours that I used in my basic jubilee nails post which you can also see HERE and for the low down on the glitter polishes that I used then feast your eyes on this post HERE.
Okay so now we are all down with those things, here is my other alternative nail design that I have created using a Union Jack nail design as an accent nail.  As I am sure you know, accent nails are currently very popular whether it is just another colour to the rest of your nails or a totally different design as I have used they are a great way to add a pop of extra detail or colour to your nails.  I have used a false nail but you can easily use a nail transfer, wrap or if your'e feeling particularly skilful you could always paint your own Union Jack design.


I think that this is a nice design that can worn by most people to add a little more interest to the nails instead of simply having plain red, white and blue, but by including a flag.  Also you only have to use 2 of the nails in that case and you still have lots left to reuse and maybe pack in a bag in case some come a little loose.  Also if you have decided to paint your own Union Jack design you only have to paint 2 flags instead of 10 which will be a lot less time consuming and less pressure to get them all the same!

Jubilee Nails - Union Jacks

Quite a while ago I saw these Union Jack nails  in Savers for about 60-70p and thought that I just had to pick them up, as they were an offer just too good to pass by.  I'm not sure if you can still pick these up anywhere else but I know that there are probably a few nail wraps or stickers or something that will give the same impression.  Also if you were feeling really creative and you have a steady hand, you could also paint a Union Jack design onto your nails.
Unlike most false nails or stick on nails that require glue to apply them, these were really simple to use.  They came with sticky adhesive patches that you simply stick onto your nails and then press the nail design on top to secure.  The patches were also really easy to adjust to the size of your nail by simply using scissors to cut off any excess from the surrounding nail.  These nails came with a squared off nails design which can be seen in the photo, but the pack also comes with a small nail file so you could always file these to the desired shape and size.


These were surprisingly simple to apply and there was non of the mess or sticky patches left that you normally get from the nail glue which makes them easy to apply in a rush.  You can also easily peel the nail off the adhesive patch after you have finished and keep them at the back of your cupboard for another time where you are feeling a bit patriotic or there is another royal celebration.


I think that for the price these nails are really good, and extremely relevant if you want to get into the patriotic mood this weekend.  They aren't necessarily something that I would wear everyday but for a special occasion, like this bank holiday, I think that you can go full out on the design for a very eye catching design that will get peoples heads turning.

Friday, 1 June 2012

Jubilee Nails - Diamond Crackle

To celebrate the Queen's Diamond Jubilee here is another nail idea that you can try out over this bank holiday weekend.  I started with the same base colours as I did in the first nail design, so if you haven't seen that post yet you can look at it by clicking HERE.


After creating the base for my design using an alternating red and blue design I decided that I wanted to create a different design on the nails to the other designs where I did full block nail colours.  You can use any crackle polish for this design and nearly every brand of nail varnish has their own version with a variety of colours, as well as matt and glitter ones.


I have chosen to use MUA's Nail Quake in a grey/silver colour called "Shattered Ice" which I think is a very interesting combination.  I chose this silver tone to link back to the Diamond Jubilee, but you could also use a white crackle so that your nails have the red, white and blue theme of the union jack.  


I applied this polish relatively thickly to create an overall silver appearance so that the blue and red only peek through the gaps in the polish, so this idea might be better for you if you wanted a more subtle nail design rather than the brighter blue and red designs that you can see HERE and HERE.


The application of the polish was very easy and creates a very unusual effect that no matter how many times you use this polish you can never not be amazed by this type of nail varnish as it magically disappears from your nails.  If you haven't tried this kind of crackling polish then you can pick this MUA one up at superdrug, on the superdrug website or on the MUA website for £2.99.

Jubilee Nails - A glittery twist

For this next design I have simply developed the first of my Jubilee designs so if you haven't seen that post yet then you can click HERE.  I have used the same base colours as previously but this time I have added a slight glittery touch to the nails to make design slightly different and a bit more fun than a simple red, white and blue pattern.


                                     On top of my Rimmel "Rapid Ruby" base I have added a coat of Barry M's polish number 150 which doesn't have a name but I would call it ruby slipper or something along those lines as the bottle is purely red glitter and reminds me of Dorothy's shoes.  This polish is amazing and unlike many glitter polishes that normally tend to have hardly any polish and you have to do about a million coats to get a vaguely opaque colour, this probably could have been done with a couple of coats.  I only used 1 coat though as I already had the red base underneath.  This adds a subtle touch of glitter and sparkle to your Jubilee design and is perfect if you are going to be going to any parties or even if you are just sitting in the garden having a BBQ with family and friends as the glitter will catch the light.


On top of the white polish I decided to use a clear polish with finely milled multi-coloured glitter, but from far away this looks relatively silver and just gives a sparkly touch to your nails and for this I used MaxFactors "Sheer Glitter" polish number 866.  I have to admit that I have had this polish for years and you can probably tell from the old bottle shape, but it is such a gorgeous polish that I still have it and still love to use it.  Although I doubt you can still get this exact shade there are bound to be many other glittery polishes out there so you can take your pick on the exact shade for your Jubilee nail designs.

Over the blue polish I chose to use NYC's polish "Lights, camera, glitter" number 105 which is a glittery polish that has finely milled silver glitter throughout with larger glitter pieces of blue.  This polish is amazing and so amazing, especially over a darker blue, or any other dark polish, because you can see how much silver glitter there is as well as the larger, more obvious chunks of blue.  Although I wouldn't want to use this completely on its own because I think that it would take a fair amount of coats to create an opaque finish, over another colour I think this polish is amazing.
Red glitter- Barry M 150, White glitter- MaxFactor- "Sheer Glitter" 866, Blue glitter- NYC "Lights, Camera, Glitter" 105
This simple addition of a glitter polish over the top of the basic red, white and blue design, makes this design more jazzy and good if you want to have a slight glittery appearance that is perfect for this time of year and the jubilee celebration.

Jubilee Nails - Simple Red, White & Blue

As we are gearing up for the Jubilee weekend I have decided to create a serious of blog posts linked to jubilee nail designs that can hopefully inspired you to get a little patriotic and bring out the red, white and blue.

First I started with just a basic nail design using red, white and blue to reflect the colours in the Union Jack.  This is a simple design that can be done in a rush before that jubilee party you are off to with just a couple of coats of red, white and blue and you're ready to go!


     The red that I used for this deign is a Rimmel London polish in "Rapid Ruby" number 320 and is a deeper red than most of the other reds that I have, which I thought was more true to the colours of the Union Jack.  This polish was really opaque and after one coat was pretty much perfect to go, but I used 2 just to make sure it was completely opaque, this would also make it super quick to apply if you are in a rush and no one needs to know that you didn't spend hours creating the perfect opaque red!

The blue that I used is Mavala's "Deep Blue" number 269 and is a gorgeous deep blue as the name suggests, but it has a beautiful green and turquoise shimmer through it.  Although this shimmer isn't essentially seen in the Union Jack I think that this shimmer adds a little something to the nails, and it is not obvious unless it catches the light.  You could also use a plain navy colour as this would link back into the union jack theme, but I love this Mavala one as it has such a creamy formulation which applies like a dream onto the nails.

The white that I used here was a basic white that I got in a Primark french manicure set for christmas a couple of years ago, and whilst it may not be the best quality, for these designs it is perfect.  The consistency of this polish is quite thick and gloopy but in regards to creating a white nail that is relatively opaque and a true white colour then this one does the job.

So here is my basic Jubilee nail design that I will build upon in future posts and show how you can either just use this simple design, or use this as a base to build on and create a more interesting and unique design.

Red- Rimmel London "Rapid Ruby" 320, Blue- Mavala "Deep Blue" 269, White- Primark

Thursday, 31 May 2012

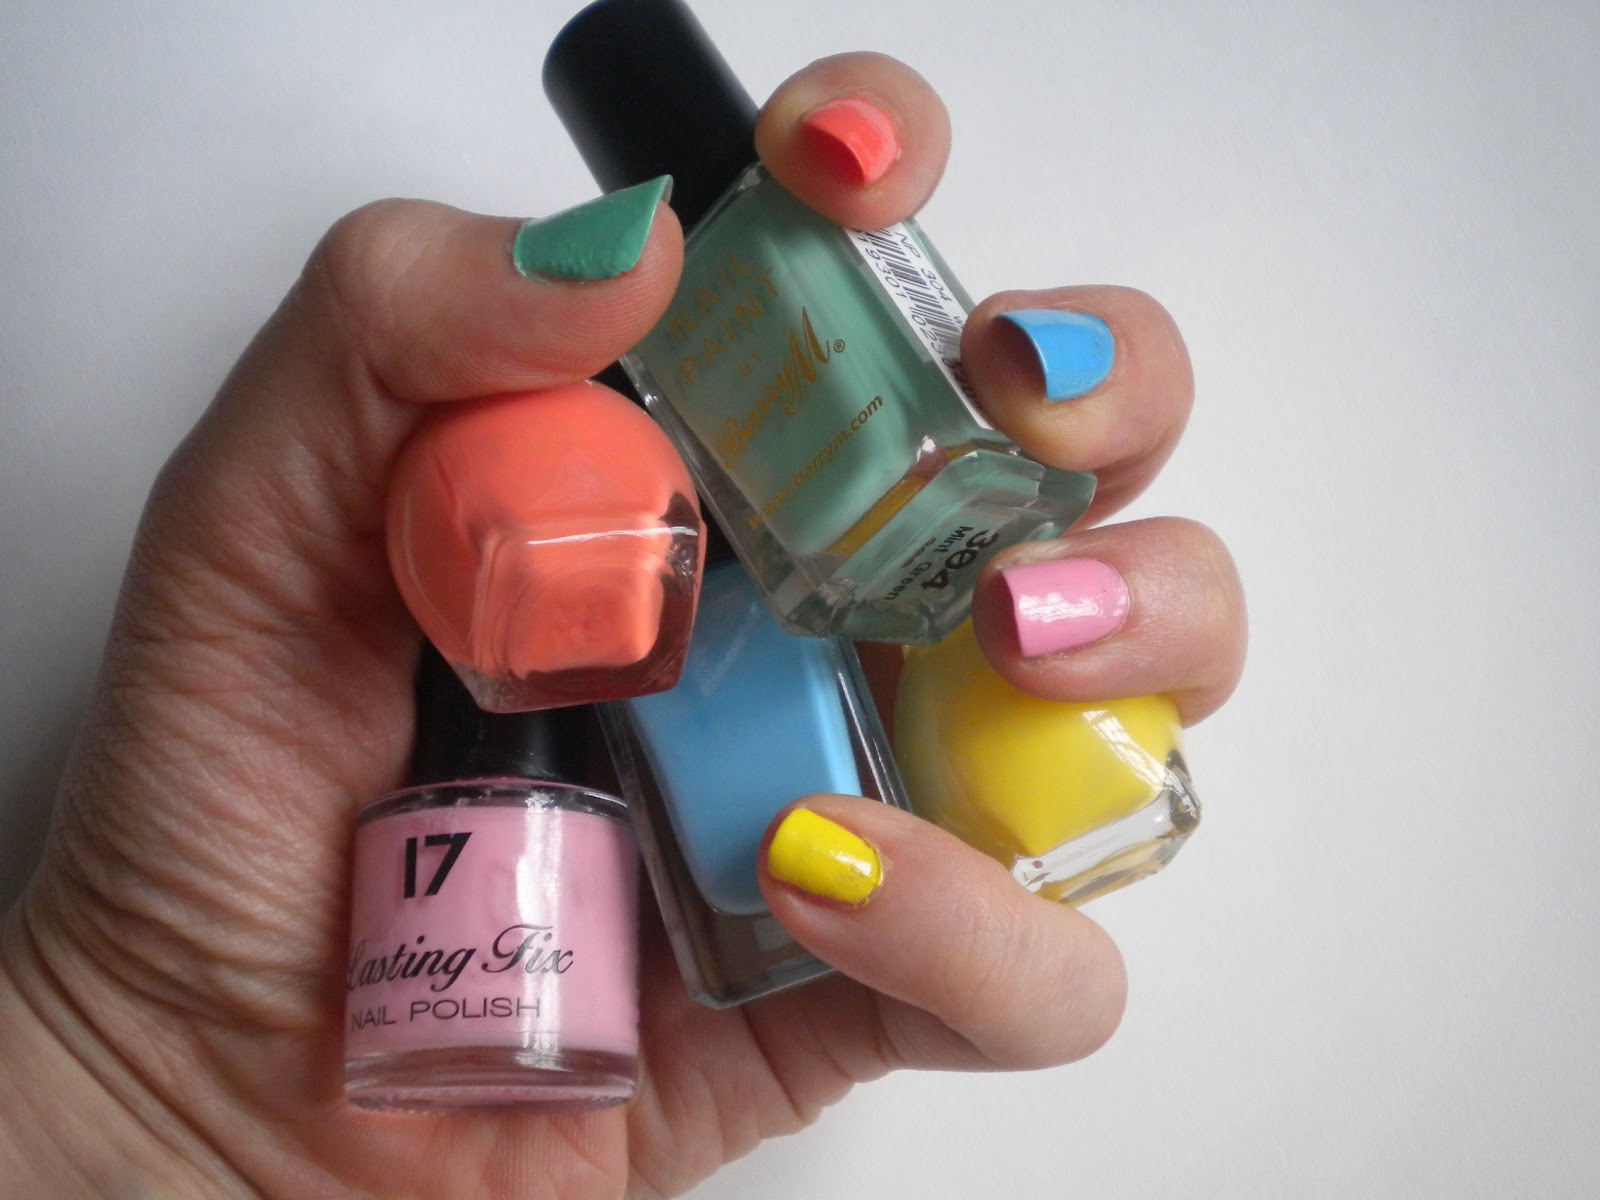
Summery rainbow nails

Today I decided to create a bright and fun nail design that will cheer you up and is an eye catching design without using complicated designs.
The colours that I chose were a minty green, peachy orange, sky blue, candyfloss pink and banana yellow as I thought these were a nice variation on the traditional pastel or ice cream shades out this spring/summer.


The first colour I used which is really popular at the moment was the mint green colour from Barry M number 304 called "Mint Green" which is a beautiful colour as it is not too wishy washy and after 2 coats is completely opaque.  You can pick up Barry M in Boots and Superdrug and with a price of £2.99 how can you not afford to pick it up.  It is fresh and very appropriate for spring/summer and is a very versatile polish that I know will last me all throughout the summer time.


Another Barry M polish that I used is the sky blue colour, number 306 called "Blueberry Ice Cream" which is a perfect blue that is brighter than a pastel blue such as a baby blue, but is still not as vivid as a turquoise.  It is the perfect summer colour that is great on toes as well as fingers and whenever I wear this I get complements on the colour, so for £2.99 why not pick yourself up one?

The pink colour on my nails is a 17 polish called "Fairy cake" which I bought a couple of years back but is currently part of the Candy Collection from Boots.  This is a little brighter, again, than a traditional baby pink however, it is a very girly pink that is not fluorescent and so is a very flattering shade. I would say it is more of a candy floss pink which I prefer because sometimes some pinks can look a bit young and childish on.


The peachy orange shade that I used on my index finger is by Miss Sporty and is number 452, which is a very unusual peachy colour.  I searched up and down the aisles to find the perfect peachy shade that was not too pink or too orange and I think I finally may have found it.  Although in the bottle the polish looks to be more of a pastel peach shade when applied it turns out slightly darker than I expected however, I think that is still a gorgeous colour and I think I will have a lot of wear out of this shade and for £1.99 I can hardly complain!


The final shade of my rainbow nails is the banana yellow on my little finger again by Miss Sport number 453.  I would describe this colour as more of a banana or sunshine yellow than a strictly lemon or pastel yellow but I think this shade of yellow is very summery.  This colour would also probably look amazing as the summer goes on and your skin starts to get a bit of a tan, so at just £1.99 these are definitely something to buy up and if you are not confident enough at the moment maybe you could bring it out as we head further into the summer months.


I think these polishes are very pretty and summery without being over the top or too bright for the duller days that still occur in summer.  It is a very easy combination that looks very interesting and can be redone in any colour combination, even different shades of the same colour would make an interesting gradient rainbow effect.
Thumb - Barry M 304 Mint Green, Index finger- Miss Sporty 452, Middle finger- Barry M 306 Blueberry Ice Cream, Ring Finger- 17 Fairy Cake, Little finger- Miss Sporty 453