Showing posts with label pink. Show all posts

Sunday, 12 August 2012

Summer Nail Challenge - Day 12

Today is Day 12 of Makeup Savvy's Nail Challenge and todays theme is striped nails, if you don't know what I am talking about then you can see more info on, or if you want to get involved yourself you can find all the information HERE.  I also did the challenge on day 6, 7, 10 and 11 so if you want to see my glitter nail post then you can HERE, if you want to see my neon nails you can HERE, if you want to see my gradient nails you can HERE and if you want to see my metallic nails you can HERE.

Okay so today's theme is stripes and I know what you are thinking when you look at the picture, I know I have used dots but I have made the pattern of stripes.  I am not good at creating the conventional stripe pattern on my nails because my hand is not the steadiest and one of the important things about the stripe is that it is relatively straight, and does not end up being a shaky mess on my nail, which mine mostly is.  So to avoid this problem, and to help any of you that are not the best at doing stripy nails, I have created this look which I hope you like, and now I will explain how I did it.


For the base coat of my nails I used this gorgeous colour by MUA called "U R FAB" which is from their love hearts collection.  I love this product for so many reasons and I have actually done a separate review HERE so if you want to find out more about this product, pricing, where to buy etc then you can but in short: the colour is so unique, the application is amazing, the opacity is great 2 coats is plenty to create an opaque nail and the drying speed is amazing.  I am a massive fan of MUA anyway as they are so affordable and when I got this I was bracing myself to not be impressed with the polish because it was so reasonable, but I have to admit if I had paid more money for this product I would not have been disappointed, so if you are near a Superdrug any time soon check out the MUA stand.


After the base coat had dried I used a white polish to create the dotted effect on my nails, the white I used was from a Primark set from a while ago but any white polish will give the same effect.  A lot of you may think that this design can only be achieved if you have a nail dotter or another nail tool, which is not the case at all.  I simply used a bobby pin, or a hair grip which ever one you call it, which if it has the tiny little grippy bobble on the end of the grip will do this effect, you can pick these up so cheaply from most stores so it is a cheap but very effective alternative to a nail dotter or nail tool.  Just dip this bobby pin into the nail varnish and then create the design on the product. Simple.  Obviously the more product on the end of the grip means the larger the dot, so you might want to vary this depending on which nail you are doing.  


I then created 2 lines of these dots down the central third of my nail as the first part of my striped nail design.  You could just leave the design here as I think it is a simple yet very effective design, and this was my original idea, but I decided to go one step further and add some more dots to create a more patterned nail.  You can also vary the colours and designs of these dots to create millions of designs, and when you have mastered the design believe me it is so simple, yet people will always question how you have done this design.


Next I chose to use this gold colour by Nails Inc called Lanesborough Place which is a colour that I also used in my metallic nails design from yesterdays challenge.  This is a gorgeous colour and also quite subtle on this design, that adds a little bit of colour but this is not too bright or overwhelming for the nail design.  I then added 3 stripes of dots on both sides of the white dots and one in the central part of my nail.  I think that this just made the nail slightly more busy and filled up than with just the white stripes, but you could have used more than just 2 colours for this design which might have made the striped design more obvious but I think that this is quite a subtle design.

So there you go, my not so traditional striped nail design, but I think that it is a bit more unusual than the normal striped design and definitely something to try out if you are not so steady handed or do not have time to spend hours doing extremely precise nail art.


If you have entered todays challenge feel free to leave a link to your blog in the comments section below, or feel free to email or tweet your photos to me, all information on how to contact me can be found on the right side of my blog.  If you haven't entered today feel free to head on over to Makeup Savvy's page to see tomorrows category HERE and see if you are up for the challenge on Day 13.

Friday, 10 August 2012

Summer Nail Challenge - Day 10

I'm back after a few technical glitches and today is Day 10 of Makeup Savvy's Nail Challenge and todays theme is gradient nails, if you don't know what I am talking about then you can see more info on, or if you want to get involved yourself you can find all the information HERE.  I also did the challenge on day 6 and 7 so if you want to see my glitter nail post then you can HERE or if you want to see my neon nails you can HERE.

This was quite a tricky theme for me because I did not want to do a design using glitter because I recently did a summery glitter design, and I am not to good with the gradual change of colour from dark to light on a single nail.  But at the same time I wanted to challenge myself and not just stick to a plain colour on a nail.  So whilst reading through some blogs last night I found this gorgeous design that Lacqueerisa created, it added some texture to her nails and the design was very eye catching, so I decided that I would have a go myself but using a light colour underneath a brighter shade, and when the design was completed I hoped it would give a different sort of gradient of colour.

10 nail polishes later this is the design I created and whilst it did not go quite to plan I think that it is a different technique that after a few goes will probably be a lot better, but in the mean time this has challenged me to try a new design I probably otherwise wouldn't have done, so its a learning curve.  If you want to see what inspired me to do this design, and how the design should look then you can see the lovely Lacqueerisa's design HERE.


So instead of giving you little reviews of the colours I have used for each nail I'm just going to explain how I did this design, as otherwise this would be a very long post.  Although, I have already done reviews for some of the polishes which I will link, but if you want to know anything about the colours I used then leave a comment below and I can always do some reviews if requested.

Okay so here we go... First of all I chose the base colours for my design which I wanted to be slightly lighter shades so that I could create the gradient effect that todays theme required.  I also tried to do a a gradient effect going along the nails starting with yellow and white right down to blues on my little finger.  To start with I painted my thumb a white colour to then be topped with yellow as I didn't have 2 shades of yellow, but actually in the end I quite liked the colour difference between the yellow and white.  This white was a basic white colour that I got in a Primark manicure set a couple of years ago.  


On my index finger I then used in colour 452 which is a peachy orange colour by Miss Sporty which is very pretty and summery colour that I have been wearing a lot this summer.  On my middle finger I have used this baby pink colour by 17 which is called Cupcake which I think is the perfect name for this extremely girly colour.  On my ring finger I have used this gorgeous light purple colour called Purple Sherbet from Ciaté which I have done a full review on which you can see HERE if you wish.  Finally on my little finger I have used this light blue colour from Barry M called Blueberry Ice Cream number 306.


After letting these colours dry I then chose colours that were similar but a shade or two darker so this would create the gradient effect that was required for todays theme.  For my thumb I chose this bright yellow colour by Miss Sporty number 453 which I also used in my neon nail challenge on day 6 and a few other reviews and designs.  On my index finger I used this bright neon orange from Miss Sporty number 303 which I also used on my neon themed nails on day 6.  On my middle finger I used this bright pink colour from 17 which again I used in my neon nails so
 if you want to know anything else about these 3 polishes you can see more on my Neon Nails post HERE.  


On my ring finger I used this bright purple colour from Barry M, suitably called Bright Purple number 303.  And finally on my little finger I have used another Miss Sporty polish in the colour 060 which is such a beautiful colour and has been a firm favourite of mine both last year and this year for summer, so I may be doing a review of this soon, so keep your eyes peeled.


Once I had painted my nails I waited for a few seconds so the polish begun to set on my nails before using a cocktail stick to create the textured pattern on the nails.  I ran the cocktail stick across my nails scratching some of the product away revealing the colour underneath.  This may have not worked perfectly on all the nails but I think that you can see some of the lighter colours coming through from underneath and so I think it does qualify as gradient I just wish it had worked as well as I thought it would.

Overall I am pleased that I have tried this design out and it is something that after a bit of practice will be something to do, that will be extremely eye catching and that people will ask how you have created the design so look out for some more designs from me using this technique as I love it!

If you have entered todays challenge feel free to leave a link to your blog in the comments section below, or feel free to email or tweet your photos to me, all information on how to contact me can be found on the right side of my blog.  If you haven't entered today feel free to head on over to Makeup Savvy's page to see tomorrows category HERE and see if you are up for the challenge on Day 11.

Thursday, 31 May 2012

Summery rainbow nails

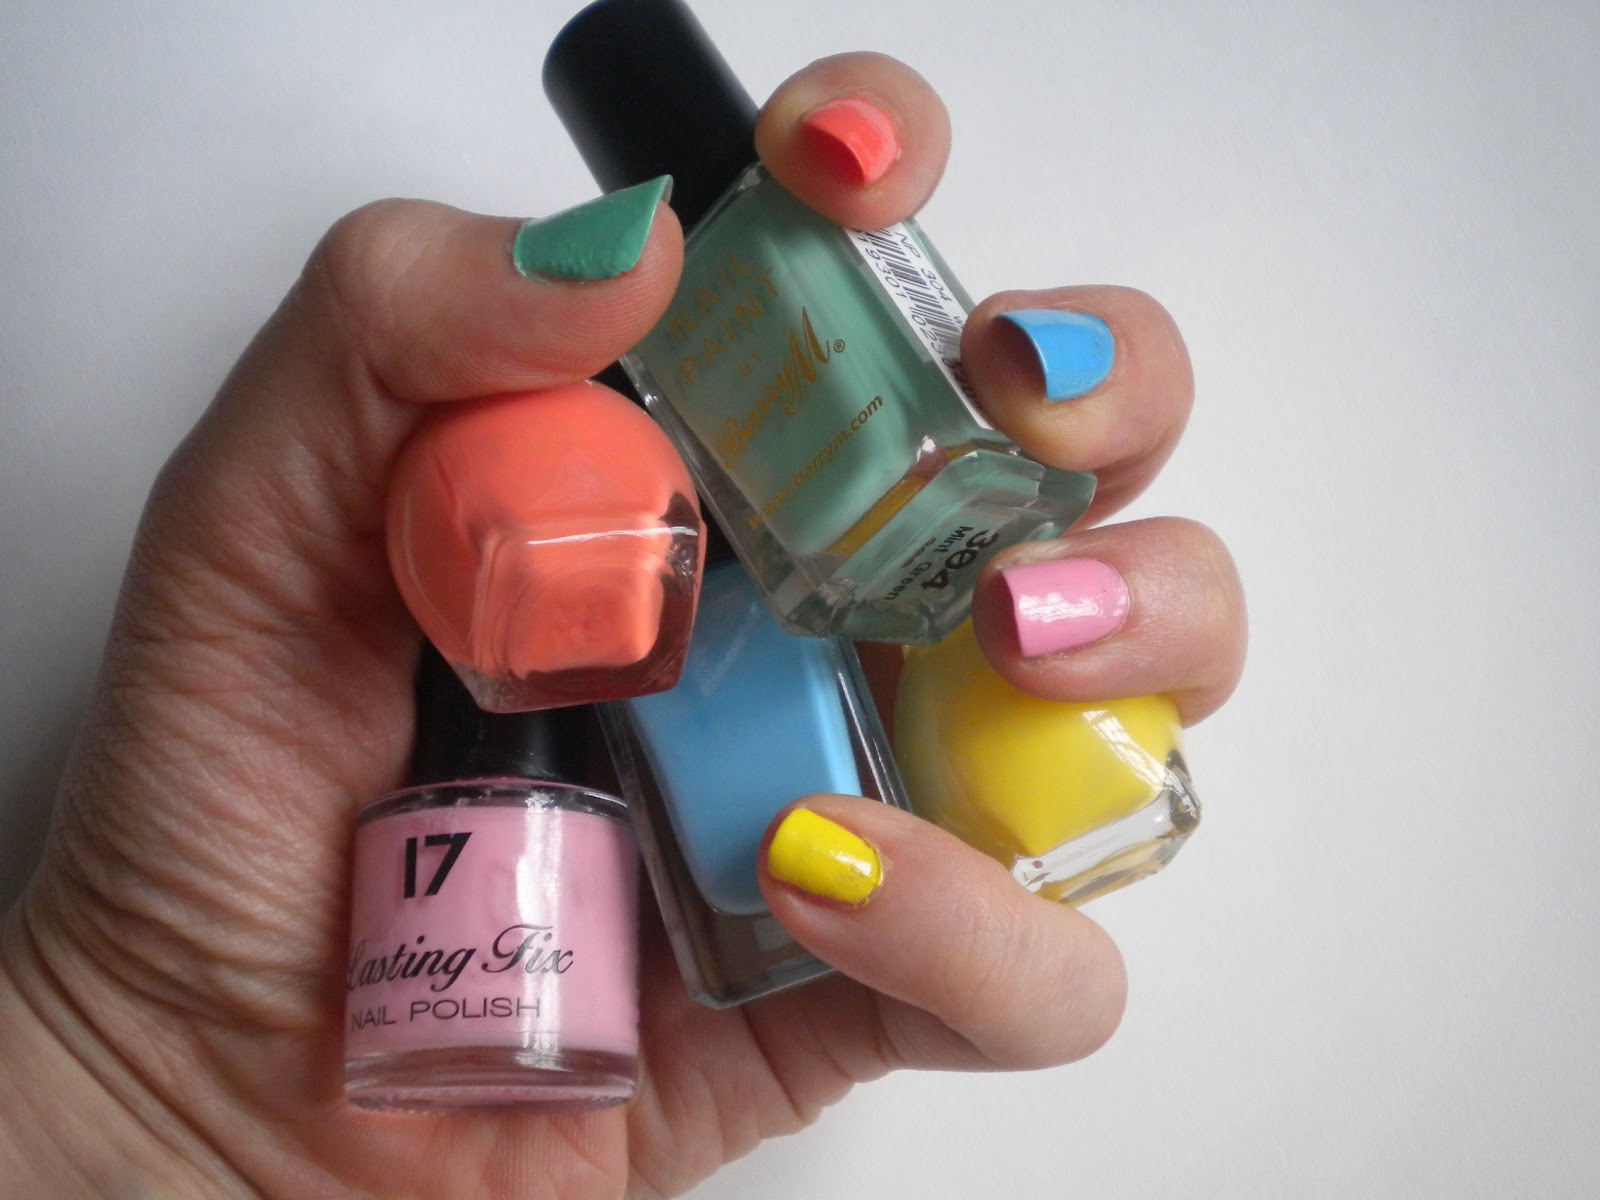
Today I decided to create a bright and fun nail design that will cheer you up and is an eye catching design without using complicated designs.
The colours that I chose were a minty green, peachy orange, sky blue, candyfloss pink and banana yellow as I thought these were a nice variation on the traditional pastel or ice cream shades out this spring/summer.


The first colour I used which is really popular at the moment was the mint green colour from Barry M number 304 called "Mint Green" which is a beautiful colour as it is not too wishy washy and after 2 coats is completely opaque.  You can pick up Barry M in Boots and Superdrug and with a price of £2.99 how can you not afford to pick it up.  It is fresh and very appropriate for spring/summer and is a very versatile polish that I know will last me all throughout the summer time.


Another Barry M polish that I used is the sky blue colour, number 306 called "Blueberry Ice Cream" which is a perfect blue that is brighter than a pastel blue such as a baby blue, but is still not as vivid as a turquoise.  It is the perfect summer colour that is great on toes as well as fingers and whenever I wear this I get complements on the colour, so for £2.99 why not pick yourself up one?

The pink colour on my nails is a 17 polish called "Fairy cake" which I bought a couple of years back but is currently part of the Candy Collection from Boots.  This is a little brighter, again, than a traditional baby pink however, it is a very girly pink that is not fluorescent and so is a very flattering shade. I would say it is more of a candy floss pink which I prefer because sometimes some pinks can look a bit young and childish on.


The peachy orange shade that I used on my index finger is by Miss Sporty and is number 452, which is a very unusual peachy colour.  I searched up and down the aisles to find the perfect peachy shade that was not too pink or too orange and I think I finally may have found it.  Although in the bottle the polish looks to be more of a pastel peach shade when applied it turns out slightly darker than I expected however, I think that is still a gorgeous colour and I think I will have a lot of wear out of this shade and for £1.99 I can hardly complain!


The final shade of my rainbow nails is the banana yellow on my little finger again by Miss Sport number 453.  I would describe this colour as more of a banana or sunshine yellow than a strictly lemon or pastel yellow but I think this shade of yellow is very summery.  This colour would also probably look amazing as the summer goes on and your skin starts to get a bit of a tan, so at just £1.99 these are definitely something to buy up and if you are not confident enough at the moment maybe you could bring it out as we head further into the summer months.


I think these polishes are very pretty and summery without being over the top or too bright for the duller days that still occur in summer.  It is a very easy combination that looks very interesting and can be redone in any colour combination, even different shades of the same colour would make an interesting gradient rainbow effect.
Thumb - Barry M 304 Mint Green, Index finger- Miss Sporty 452, Middle finger- Barry M 306 Blueberry Ice Cream, Ring Finger- 17 Fairy Cake, Little finger- Miss Sporty 453