Showing posts with label designs. Show all posts

Friday, 10 August 2012

Summer Nail Challenge - Day 10

I'm back after a few technical glitches and today is Day 10 of Makeup Savvy's Nail Challenge and todays theme is gradient nails, if you don't know what I am talking about then you can see more info on, or if you want to get involved yourself you can find all the information HERE.  I also did the challenge on day 6 and 7 so if you want to see my glitter nail post then you can HERE or if you want to see my neon nails you can HERE.

This was quite a tricky theme for me because I did not want to do a design using glitter because I recently did a summery glitter design, and I am not to good with the gradual change of colour from dark to light on a single nail.  But at the same time I wanted to challenge myself and not just stick to a plain colour on a nail.  So whilst reading through some blogs last night I found this gorgeous design that Lacqueerisa created, it added some texture to her nails and the design was very eye catching, so I decided that I would have a go myself but using a light colour underneath a brighter shade, and when the design was completed I hoped it would give a different sort of gradient of colour.

10 nail polishes later this is the design I created and whilst it did not go quite to plan I think that it is a different technique that after a few goes will probably be a lot better, but in the mean time this has challenged me to try a new design I probably otherwise wouldn't have done, so its a learning curve.  If you want to see what inspired me to do this design, and how the design should look then you can see the lovely Lacqueerisa's design HERE.


So instead of giving you little reviews of the colours I have used for each nail I'm just going to explain how I did this design, as otherwise this would be a very long post.  Although, I have already done reviews for some of the polishes which I will link, but if you want to know anything about the colours I used then leave a comment below and I can always do some reviews if requested.

Okay so here we go... First of all I chose the base colours for my design which I wanted to be slightly lighter shades so that I could create the gradient effect that todays theme required.  I also tried to do a a gradient effect going along the nails starting with yellow and white right down to blues on my little finger.  To start with I painted my thumb a white colour to then be topped with yellow as I didn't have 2 shades of yellow, but actually in the end I quite liked the colour difference between the yellow and white.  This white was a basic white colour that I got in a Primark manicure set a couple of years ago.  


On my index finger I then used in colour 452 which is a peachy orange colour by Miss Sporty which is very pretty and summery colour that I have been wearing a lot this summer.  On my middle finger I have used this baby pink colour by 17 which is called Cupcake which I think is the perfect name for this extremely girly colour.  On my ring finger I have used this gorgeous light purple colour called Purple Sherbet from Ciaté which I have done a full review on which you can see HERE if you wish.  Finally on my little finger I have used this light blue colour from Barry M called Blueberry Ice Cream number 306.


After letting these colours dry I then chose colours that were similar but a shade or two darker so this would create the gradient effect that was required for todays theme.  For my thumb I chose this bright yellow colour by Miss Sporty number 453 which I also used in my neon nail challenge on day 6 and a few other reviews and designs.  On my index finger I used this bright neon orange from Miss Sporty number 303 which I also used on my neon themed nails on day 6.  On my middle finger I used this bright pink colour from 17 which again I used in my neon nails so
 if you want to know anything else about these 3 polishes you can see more on my Neon Nails post HERE.  


On my ring finger I used this bright purple colour from Barry M, suitably called Bright Purple number 303.  And finally on my little finger I have used another Miss Sporty polish in the colour 060 which is such a beautiful colour and has been a firm favourite of mine both last year and this year for summer, so I may be doing a review of this soon, so keep your eyes peeled.


Once I had painted my nails I waited for a few seconds so the polish begun to set on my nails before using a cocktail stick to create the textured pattern on the nails.  I ran the cocktail stick across my nails scratching some of the product away revealing the colour underneath.  This may have not worked perfectly on all the nails but I think that you can see some of the lighter colours coming through from underneath and so I think it does qualify as gradient I just wish it had worked as well as I thought it would.

Overall I am pleased that I have tried this design out and it is something that after a bit of practice will be something to do, that will be extremely eye catching and that people will ask how you have created the design so look out for some more designs from me using this technique as I love it!

If you have entered todays challenge feel free to leave a link to your blog in the comments section below, or feel free to email or tweet your photos to me, all information on how to contact me can be found on the right side of my blog.  If you haven't entered today feel free to head on over to Makeup Savvy's page to see tomorrows category HERE and see if you are up for the challenge on Day 11.

Monday, 6 August 2012

Summer Nail Challenge - Day 6

So I realise a challenge should start at Day 1 but after seeing the post only yesterday I decided that its better to be late than never.  I have decided to do Makeup Savvy's 15 day challenge which if you want more info on, or if you want to get involved yourself you can find all the information HERE.

Okay so today's theme was glitter and I wanted to do a summery design that is appropriate for the summer holiday season, if you are going away or staying at home I think that this is something that everyone can wear, no matter where you are this summer.  I was contemplating using the models own glitter in Ibiza Mix which is a very summery polish but as I have already used that in a few of my reviews and posts which you can see HERE if you wish, I decided to use another combination which is equally as summery.


I have recently done a post on the MaxFactor Mini Polish Dazzling Blue - number 14 -  which you can read HERE if you want to find more information about the product and what I thought of it.  I think it is the perfect summery blue that is not too over the top, so everyone can use this for what ever summer event you may be attending this month.  This polish doesn't have any glitter in it but makes a gorgeous base, especially as it catches the light and changes colour which I think is a lovely combination with the glitter which also sparkles in the light.

I then decided to add a blue glitter colour on top as to keep with the blue theme, and for this I chose NYC's Lights, Camera, Glitter - number 105 - which is one of my favourite glitter polishes to date.  When I first saw this polish I was instantly drawn to all the glitter suspended in the polish, this was an instant seller as it looked really pretty and glittery.  But when it came to applying it I didn't have high hopes for the glitter to pay off as it in the bottle onto the nails, as I thought back to when I was much younger and would spend hours fishing around the glitter polish to get more than one glitter particle onto my nails at a time.  Upon application, I have to say I was pleasantly surprised that all the glitter translated beautifully onto the nails.  


Although there are far fewer larger pieces of blue and purple glitter on my nails, the fact that this largely milled glitter is suspended in a very finely milled silver glitter meant that even though the large pieces of glitter didn't totally cover my nails the small pieces did.  This meant the nails weren't patchy or unevenly covered, instead it left this beautiful blue glittery nail that was not too in your face, but when it caught the light meant it sparkled enough to catch some peoples attention.  


I love this new found combination and definitely will be trying this out again in the near future, whilst also trying different combinations with the glitter polish as I think the pay off for the money is excellent.


If you have entered todays challenge feel free to leave a link to your blog in the comments section below, or feel free to email or tweet your photos to me, all information on how to contact me can be found on the right side of my blog.  If you haven't entered today feel free to head on over to Makeup Savvy's page to see tomorrows category HERE and see if you are up for the challenge on Day 7.

Sunday, 22 July 2012

Floral Nail Wraps - A Summer Hit or Miss?

Nail Wraps have been the one of the newest and most inventive nail products to come onto the scene in recent years and have been something that has intrigued me for a while.  They range in designs from plain block colours similar to those you can achieve with 2 coats of nail varnish, to intricate patterns that unless you are prepared to spend hours on end trying to recreate and are a whizz with a nail art set, are unachievable (at least for me).  However, something that has put me off trying these nail wraps are the price, the average being around 10-16 nail wraps for prices varying from £5-£6 depending on shop, make and design.  But, whilst nosing around the Accessorize sale a couple of weeks ago I saw some that were 50% off, so for only £2.50 I thought it was my best opportunity to try some out, so here is what I thought about the product.


Did you like the product itself?
I decided to choose a pattern that I otherwise was not likely to achieve no matter how long I sat in front of the TV with my nail art kit, so I chose to this floral pattern which I thought was perfect for the long awaited summer months.  The overall look of these nail wraps is really pretty and girly and gorgeous for the summer.  


The pattern is highly detailed with lots of small brightly coloured flowers.  Overall I cant fault the look of the product as I got lots of compliments on the design so in this respect they are a real winner.  Also when I was looking around before purchasing these, I hadn't seen any that were similar to this design which was quite nice to find something that no one else would have.


How easy was it to apply the nail wraps?
Here is another rave review for this part of the product, prior to applying these I was worried how difficult it would be to effectively apply these to create the smooth almost painted on effect that these wraps should have.  But, I was surprised just how easy they are, and this was a definite plus point in my books.  When people asked about my nails and how I had done them, they were surprised I had applied them myself and said they would have thought it would have been a tricky and fiddly process, but I can promise you its not.  The instructions on the back make out that the process is a little tricky, so if you would be interested I can do another post on how to apply nail wraps if this would be useful?  Let me know your thoughts in the comments section below.


How long did the nail wrap design last?
Unfortunately this is where the good news and rave reviews end.  After everything I have said about the product you can tell that I loved the product, but after the first day I was very disappointed with the wear of this product.  On the back of the product itself it does not say how long they are expected to last, but whilst having a little bit of a search on the web many similar products from other brands say they will last between 5-7 days on the nails, some promising even more but the average was about 6 days.  So I'm sure you'll agree that after about 1-2 days finding that my nails were terribly chipped and beyond a small chip you can ignore, really dampened the mood and my view of these nail wraps.  To save this post from being to long I have done a separate post on this aspect day by day pictures so you can see what I mean, so you can see that HERE if you are interested.


Do you think that nail wraps are worth the hype or the price tag?
Now this is a tricky one.  For colour, design, application and the amount of compliments I got yes, I can not fault them on this.  But in terms of how long these ones lasted, I think I would have been outraged to pay £5-£6 for something that only lasts one day.  But I don't know if I got a dodgy pack or if thats why they were in the sale or anything.  Maybe some other nail wrap makes would be better quality but for the moment I will not be buying anymore.


I don't like writing bad reviews on any products but I thought that I should make you aware of this problem and I wanted to know if you have tried any nail wraps and they have lasted longer than these please let me know.  Also if you have any tips for making nail wraps last longer then I would appreciate that.  Any other questions let me know in the comments below and I will answer them...

Wednesday, 27 June 2012

Pastel Perfect - Lilac and Green

So for a bit of a change today I decided to paint my nails using 2 colours instead of one, to create a bit more of an unusual design.  If you have seen many blogs recently you may have seen a few designs using accent nails and 2 colours in one nail combination, and I thought I would share my new combination with you.

I often find that when the weather is a bit dull, as it has been over the past few weeks, its often hard to wear brighter colours even though it is technically summer, I can't face wearing garish colours on my nails sometimes but fear not...I have a solution for you.

For my pastel combination I have chosen to wear a green colour as the basis for my nails but feeling as though I couldn't pull this off in the not so summery weather I combined this with a lilac purple colour which has created a nice duo in my opinion.

For my Green colour I have used NYC Expert Last Nail Polish number 253 and in colour Mint Macaroon, which I think is such a amazing name.  It is a slightly duller mint green colour which is perfect for the days where the sun is not shining so brightly where you are, and I also think this will be a lovely colour for the late summer/autumn time of year because you can still be wearing a bright colour even though if it is not quite the time for a neon green.


In terms of application it was pretty good, with a creamy consistency which applied very nicely and was almost completely opaque after 2 coats.  Also the polish claims to last for up 7 days which would be perfect if it did but as I have just applied this I can not tell you if that is true, but so far it has lasted pretty well and shows no sign of chipping after the first day, but I will try to update this throughout the week to see how this polish lasts.


NYC is a brand that I previously had not explored or heard of all that much but honestly I can not say much bad about it.  Their products are really cheap for their quality and can easily be picked up in Superdrug without breaking the bank, so definitely check them out the next time you are in your local Superdrug store.


For the other colour I used Ciaté paint pot in the colour Purple Sherbet which I got in Marie Claire last month.  I have already done a whole review based on this polish which you can see HERE but basically I love Ciaté polishes.  I previously had not seen or tried Ciaté because they are on the pricier end of the spectrum but I can totally see why they are more expensive and I am now a convert and I will definitely be picked some more to add to my collection in the future.


I think that this combination is really pretty and something that anyone can pull off and put together no matter how big your collection is, or what colours you have.  Another idea that I had is to combine different tones of polish into one design and also using a vivid colour for the summer as the accent colour.  I will probably be trying these designs out in the future, so watch this space!


Have you tried any accent nail designs?  What is your favourite colour combination?

Sunday, 24 June 2012

MaxFactor - Fantasy Fire


If you have been anywhere near the blogging and vlogging scene over the last couple of months then you have probably heard of Fantasy Fire being a nail varnish that has been sort after by many people, and finally now I have got my hands on this polish heres what I think...
They say you should never judge a book by its cover, but I was drawn in by the look of Fantasy Fire immediately when I saw it.  I knew it was one of those products that everyone in the blog world seemed to want but I think until I saw it I never really understood why.  It is a gorgeous colour with  finely milled holographic glitter.  The polish is predominately but as you rotate the bottle the glitter changes colour from a bluey/greeny turquoise colour to a more orangey/coppery colour.  I don't think I have done it justice in my description or photos but if you check it out for yourself you'll see what I mean.
I am a fan of glittery shimmery polishes but I was concerned how dual toned this product would be but overall I really like it.  There is a subtle change of colour that is obvious to anyone paying close attention to your nails but is not too over the top and bright if you were concerned about how wearable this polish would be.  I guess this product is no brighter than a normal purple polish but instead this just has some holographic glitter to make it a little bit more unusual


Overall, I do really like this product and the colour is beautiful and perfect for the summer season, when it eventually decides to arrive, and in the mean time it is also a colour that can just brighten up an outfit or a dull monday morning.  For the unique colour polish this product would get a 5/5 from me and I can completely understand the hype around this product, but unfortunately there is, in my eyes a slight downside to this product.

Personally I love to be able to apply 2 coats of a polish and it would be totally opaque and long lasting and Fantasy Fire unfortunately does not tick all those boxes.  In terms of lasting without a top coat, again I can't really fault this product but in terms of opacity in my eyes it gets a 2/5.


When I first applied this product I was shocked at how transparent this turned out and unfortunately I was very disappointed.  If you only applied 1-2 coats the polish made your nails turn a strange purple colour and did not great so this is something that you definitely have to be prepared to put time into this to get the desired colour.   But do not fear with a few coats this product looks amazing on your nails and is very long lasting, but if something that you look for in your "perfect product" is opacity in a few coats then this may not be for you.


In this photo I have applied 5-6 coats and although they do not take too long to dry it is just a pain to have to apply this many coats to achieve the colour and opacity that I wanted.  I do love this product and it is just a shame that the opacity is not great otherwise I would not be able to fault this product, but I think that it is definitely worth a try so if you can get your hands on this colour do give it a go.

You can pick up MaxFactor pretty easily from Boots or Superdrug in store or on Boots website or Superdrug website.  It will cost you £3.99 and you don't get a load of product because it is in MacFActor's mini nail polish range, but for the colour I think this is totally worth it, especially if you can pick it up in a deal like I did a few weeks ago in a 3 for 2 in Superdrug where I got 2 other MaxFactor polishes which will be reviewed on here soon so keep your eyes peeled.


Have you tried Fantasy Fire?  Did you have a problem with the opacity?  Do you think its worth all the hype?

Wednesday, 13 June 2012

Ciaté Purple Sherbet Update

As I said in my previous post which can be seen HERE I have decided to include an update on how this polish has worn, to test how long lasting it is, because sometimes what appears to be an amazing polish can often fall down on how long it lasts on the nails before chipping.

1-3 days after applying the polish there was relatively little wear on the nail varnish which I found amazing because normally without a top coat you can begin to see slight chipping and just overall wear on the nails in this time frame.

4 days after applying the polish I developed a small amount of chipping on corners of the nails, but this was not extremely noticeable to anyone else apart from me, and it was not bad enough to have to reapply the whole nail varnish layer on your nails.  But in the same respect, if you were particularly bothered by this small amount of chipping you can easily reapply 1 or 2 coats of nail polish on top to hide this, but personally it was not bad enough for me to do this yet.

So far I have been particularly amazed by the long lasting finish of this polish especially without applying a top coat, suggesting that if you did it would last for much much longer than without.  I will continue to update this throughout the remainder of the week to see how this continues to progress, but so far I have been extremely impressed.

Sunday, 10 June 2012

Ciaté Paint Pot - "Purple Sherbet"


I have to admit that I am in fact a Ciaté newbie and prior to this purchase I had never tried a Ciaté polish before.  They are not the easiest polish to get your hands on in the UK and so I had never really picked one up, even though I had heard rave reviews about their products.


So when I heard that Marie Claire were giving away Ciaté polishes as a freebee with their magazine this month, I decided that this was an offer to good to resist.  Marie Claire are currently offering a choice of 3 Ciaté polishes in pretty summer shades called; Bon Bon (a taupe/nude colour), Jelly Bean (a bright pink shade) and Purple Sherbet (a pastel lilac/purple).  I have currently only picked up Purple Sherbet but after this purchase I am tempted to pick up the others too!


Normally Ciaté Paint Pots are around the £9 mark here in the UK but with the magazine you can pick these ones up for a fraction of the price at £3.70 each.  This means for all you Ciaté addicts I am sure you agree with me that this is an offer too good to resist as you can collect all 3 polishes for £11.10 which if you bought them normally would come to £27!  Also for all you Ciaté newbies like me it is a great way to try out the brand before committing to the full priced bottles.


Now onto what I though about the product, overall I was very pleased with the product, the consistency was very creamy and the coverage was excellent and I can easily see why they are normally priced at £9. I am yet to see how long this lasts on my nails but I will update this later in the week to let you know how this polish wears throughout the week.  But at the moment I find it very hard to criticise anything about this polish and I am I defintiely considering buying some more Ciaté polishes in the near future.


Another thing that I was also very impressed about was the bottle of this polish.  It has a very unique shape as it is a curved bottle, which instantly caught my eye when I took it out the packaging, and now stands out in my collection.  I thought this was a nice little addition to the whole Ciaté brand as it makes a difference to the bog standard nail varnish bottle shape.  Also the lid is slightly longer than the typical nail varnish lid which made applying the polish very easy.  As well as this, application was made easy by the large brush which meant you didn't have to make too many brush strokes to cover the nail which just made the whole application process easy and simple.


Overall I am incredibly impressed by my Ciaté Paint Pot and I am now a convert that is more than prepared to pay the £9 price tag for this polish.  You get 13.5ml in a bottle which is a good amount and the quality is superb so definitely check out the Marie Claire this month if you are yet to try Ciaté, and maybe collect all 3 colours...I am very tempted after this first Ciaté addition to my collection!


Wednesday, 6 June 2012

Pinks and glitter inspired by Sprinkleofglitter

After doing my previous post on the gorgeous colour by MUA "U R FAB" and seeing Sprinkleofglitter's post about pink sparkly nail varnish for the summer I decided the create my own version of her summer designs.  If you haven't seen the Louise's post you can click HERE to see her beautiful summery polishes.  I took the base coat of MUA's "U R FAB" which I have done a blog post on HERE if you wish to see it, I decided to see how the polish looked as a base to some glittery top coats.


The first glittery colour I decided to use was Revlon's Facetts of Fushia which was available in the autumn/winter of 2011 and is a gorgeous and very unusual polish.  It is actually I very deep purple/almost black polish with a range of purple glitter segments suspended in the polish.  It is a pretty shade but due to the dark colour of the polish it hides the purple/pink underneath so I would say its not really worth using the MUA shade under this glitter polish. But it does make a pretty design if you use this colour for one nail with the rest of your nails in the MUA shade.


Another design is using the blue and silver glitter polish by NYC called "Lights, Camera, Glitter" which is a pretty polish to use over the top of another polish to jazz up the design, which can be seen on the middle finger of the photo below.  Although this polish only has very small reflects of purple in the polish which is barely noticeable the finely milled silver glitter really adds something to the design.  You can still currently still buy this polish in Superdrug for just under £3...bargain for this sparkle top coat.

Here are all 3 of the glitter polishes that I used over the top of my MUA "U R FAB" polish and I think all of them look amazing, and could all be worn for different events and occasions.  From right to left MUA "U R FAB" base colour, MUA & Revlon Facetts of Fushia, MUA & NYC "Lights, Camera Glitter" and MUA & Models Own "Ibiza Mix"


My final glitter colour I have decided to use is Models Own Ibiza Mix which you can currently pick up from Boots, on the Boots website, or in a Models Own store or on their website for £5.  I have previously done a blog post on this polish over a yellow base which you can see HERE but I thought I would try it out over this shade too.  I have to say that every time I use this polish I fall a little but more in love with it!  It is probably the most versatile glitter top coat I have ever used and I just love the way it looks on the nails.  Since creating this design and trying it out on one nail I have painted all my nails in this combination and it is definitely my favourite out of the 3.

MUA Love Heart Collection - "U R FAB"

When I was looking around Superdrug I spotted this beauty on the MUA stand.  Although I had been aware of the Love Heart Collection that MUA have brought out I hadn't seen this colour before in the shops, so whilst it was still there I had to snap it up.  When I first heard the collaboration I couldn't wait to try them out as they are some of my favourite things, who doesn't love the cute messages on the sweets!  I was therefore so excited to the see the label on the top of the polish was in the style of a Love Hearts message, so the packaging was an instant win.
This colour is a gorgeous cranberry/dark pinky colour, called "U R FAB", which is great if maybe you aren't such a girly candy floss pink kind of gal, like me, so this is a nice compromise between a pink and purple.  It would also make a nice change from the traditional baby pinks that can be found in almost every shop anywhere in the world, and personally I don't have a polish this colour in my collection.  I would be happy to pay more money to find this colour but now I don't have to!


I love MUA products but had never really tried that many of their nail polishes before this one, so I was a bit sceptical as sometimes the low cost of the products can make the quality not so good.  But how wrong I was.  This is such a glossy and creamy consistency that it glides onto your nails beautifully and with 2 coats is almost completely opaque.


I was also amazed at how quickly this dries, but within at least 2 mins the polish was completely dry with 2 coats on, which is not normally the case for me to get a completely opaque finish, even with a 60 seconds polish.  It came as a surprise when I brushed my nail on something, and looking down fearing I had just smudged the polish I was pleasantly surprised that it was already dry!  I think that this would be perfect for when your'e in a rush, or a great polish to throw in your bag for touch ups throughout the week.


MUA can be picked up in your local Superdrug store, on the Superdrug website or on the MUA website.  Also at the moment Superdrug are having a 3 for 2 offer so why not collect more of the Love Hearts collection, at only £2 each you can't afford to miss this gorgeous collection and I definitely can't wait to pick some more shades up soon!


Tuesday, 5 June 2012

Future Giveaway

If you haven't already subscribed to this blog and you like all things to do with nails and nail varnish then feel free to subscribe for instant updates on my latest reviews and designs.  Once I get to a certain number of subscribers I will be doing a nail product giveaway, so for a chance to be entered into this subscribe and share my blog on twitter, Facebook or the good old fashioned word of mouth.


Thanks for all your support and views, it means the world to me and hopefully I can announce the giveaway!!

Jubilee Nails

For an easy way to navigate around my blog I have create a compilation of all the photos of Jubilee designs that I created so that if you like the design you can click on the matching number to the design that you like and you will be taken to that design...now thats what I call magic!


Have a wonderful Jubilee bank holiday and let me know if you try out any of my designs!

Jubilee Nails - A spot of colour

For my final post of the Jubilee bank holiday I have decided to go for something that isn't the traditional designs that I have mostly shown before, instead this is something a little different but still with the red, white and blue theme.


For this I used the same colours as I used in the first design which can be found HERE but you can use whichever colours you already have or that take your fancy.  I simply painted my nails a white colour all over, before adding the colour detailing on top.


You can obviously use more technical tools such as dotters along with many others but what I used, which is just as good and much much cheaper...a hair grip, curvy grip or bobby pin whatever you want to call it.  I got a pack of 50 for £1 at Poundland and they are in my eyes just as effective.  Just dip the curvy grip into the nail polish, and the more you use the bigger the dots that you create, simple.


For the first part of this design I chose to use alternating colours of blue and red dots on the design, which you can leave as a final design, but I then decided to add to this design by also using the opposite colour to the one that I had already applied to the nails to create more of a busy design what incorporated red, white and blue into all nails.


I think that these nails are very easy to complete and are something that you could even wear after the Jubilee celebrations because they aren't as obviously Jubilee related, unlike some of the designs that have Union Jacks on.

Sunday, 3 June 2012

Jubilee Nails - British Manicure

For this design I created a unique take on a French Manicure design, which looks a lot harder to achieve than it actually is.  To see what colours I used as part of the design click HERE to see the original post I did about Jubilee colours.


For this I simply painted my nails alternating blue and red colours, I deliberately left out the white nail because I wanted to use the white for the tip of the nail, but you could easily have a white nail and use alternating red, white and blue tips for another design idea.
After painting my nails a block colour I then used a white colour to create a French tip, however recreating the perfect French tip can be a tricky manoeuvre especially to get 10 nails looking vaguely similar.  So I changed the design slightly and made the white tip slightly diagonal as to create an interest to the nail as well as making it easier for myself as they could be slightly different and also allowed for error!


I think that these nails are very simple but overall look pretty and are a nice alternative to French manicure or a block nail colour of red, white and blue.  Of course if you have a steady hand or have a tip for getting the perfect French tip then you can also use this for the nails instead of the diagonal design.  Also this diagonal tip can also be transferred into any other design throughout the year, as well as adding this to a nail that has begun to chip and wear throughout the days as a quick touch up tip.

Thursday, 31 May 2012

Summery rainbow nails

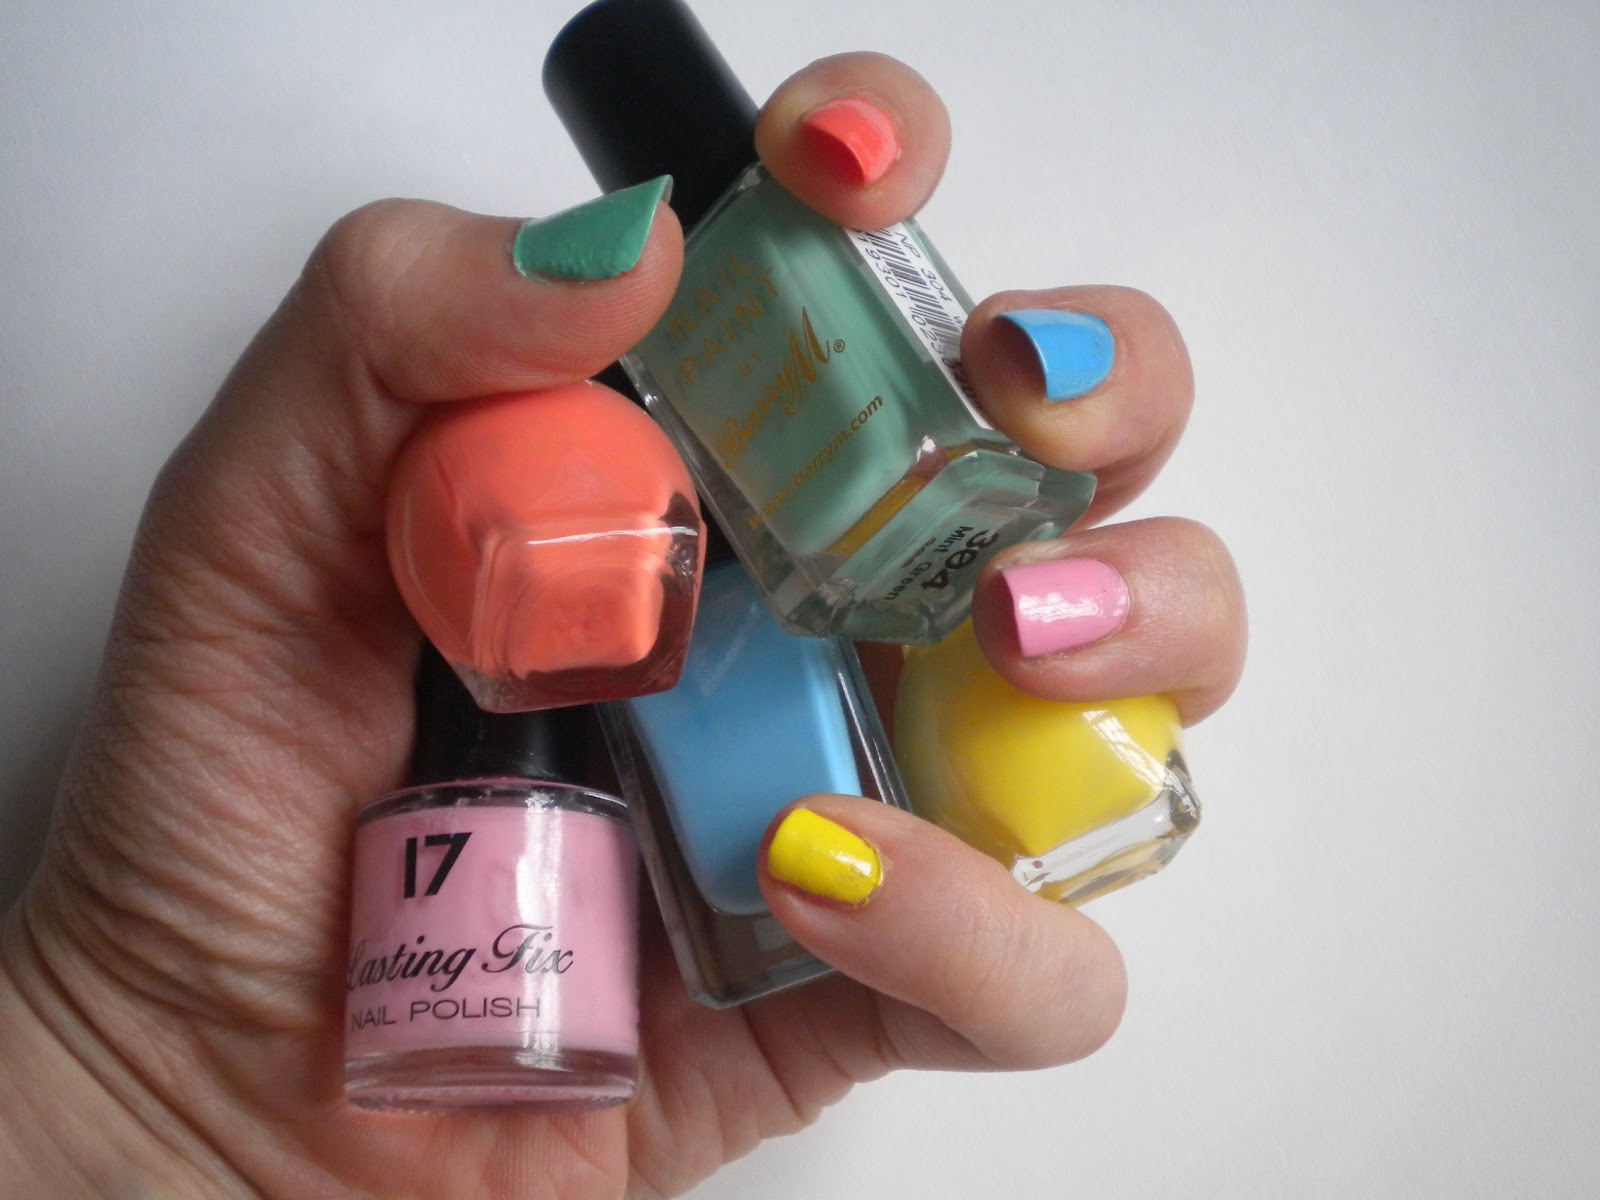
Today I decided to create a bright and fun nail design that will cheer you up and is an eye catching design without using complicated designs.
The colours that I chose were a minty green, peachy orange, sky blue, candyfloss pink and banana yellow as I thought these were a nice variation on the traditional pastel or ice cream shades out this spring/summer.


The first colour I used which is really popular at the moment was the mint green colour from Barry M number 304 called "Mint Green" which is a beautiful colour as it is not too wishy washy and after 2 coats is completely opaque.  You can pick up Barry M in Boots and Superdrug and with a price of £2.99 how can you not afford to pick it up.  It is fresh and very appropriate for spring/summer and is a very versatile polish that I know will last me all throughout the summer time.


Another Barry M polish that I used is the sky blue colour, number 306 called "Blueberry Ice Cream" which is a perfect blue that is brighter than a pastel blue such as a baby blue, but is still not as vivid as a turquoise.  It is the perfect summer colour that is great on toes as well as fingers and whenever I wear this I get complements on the colour, so for £2.99 why not pick yourself up one?

The pink colour on my nails is a 17 polish called "Fairy cake" which I bought a couple of years back but is currently part of the Candy Collection from Boots.  This is a little brighter, again, than a traditional baby pink however, it is a very girly pink that is not fluorescent and so is a very flattering shade. I would say it is more of a candy floss pink which I prefer because sometimes some pinks can look a bit young and childish on.


The peachy orange shade that I used on my index finger is by Miss Sporty and is number 452, which is a very unusual peachy colour.  I searched up and down the aisles to find the perfect peachy shade that was not too pink or too orange and I think I finally may have found it.  Although in the bottle the polish looks to be more of a pastel peach shade when applied it turns out slightly darker than I expected however, I think that is still a gorgeous colour and I think I will have a lot of wear out of this shade and for £1.99 I can hardly complain!


The final shade of my rainbow nails is the banana yellow on my little finger again by Miss Sport number 453.  I would describe this colour as more of a banana or sunshine yellow than a strictly lemon or pastel yellow but I think this shade of yellow is very summery.  This colour would also probably look amazing as the summer goes on and your skin starts to get a bit of a tan, so at just £1.99 these are definitely something to buy up and if you are not confident enough at the moment maybe you could bring it out as we head further into the summer months.


I think these polishes are very pretty and summery without being over the top or too bright for the duller days that still occur in summer.  It is a very easy combination that looks very interesting and can be redone in any colour combination, even different shades of the same colour would make an interesting gradient rainbow effect.
Thumb - Barry M 304 Mint Green, Index finger- Miss Sporty 452, Middle finger- Barry M 306 Blueberry Ice Cream, Ring Finger- 17 Fairy Cake, Little finger- Miss Sporty 453